Raspbian Continuously Run Python Script on Boot
Raspberry Pi is a tiny, cost-effective computer that comes in many shapes and sizes and facilitates a whole host of applications, ranging from something as simple as learning how to code to complex home automation projects; the scope of use is limitless.
One of the many features that make the Raspberry Pi so versatile is its ability to run all kinds of programs, just like a regular computer. In fact, not just that, you can even write your own scripts — for whatever objective you have in mind — and run them on the Pi.
Why Would You Want To Run a Program at Startup?
Although the Raspberry Pi is capable of running all sorts of programs, you still need to manually execute these programs every time you want to run them. Clearly, this approach involves an extra step. And even though it doesn't pose much inconvenience, there are instances when you'd need a program to run right after the Raspberry Pi boots up.
For example, imagine using your Raspberry Pi to monitor stock prices: wherein you run a script every day when your Pi boots up, and it pulls information from pre-defined resources and presents it to a display.
Here, despite streamlining the process of tracking stock prices, you still have to execute the script each day. However, thanks to automation, it's possible to eliminate the manual input from the equation by having your Pi run the script automatically on startup.
It's for situations like these when you'd want to run a program on startup.
How to Run a Program at Startup
There are several ways to run a program at startup on Raspberry Pi. For this guide, though, you'll learn how to use three of these effective and easy to follow methods.
Note: We've used these methods to execute our Python script, and you can do it with any of your scripts or even the onboard programs on Raspberry Pi. Just make sure you're using the right method to execute your program.
1. Use rc.local File
rc.local is a system-administered file that executes after all the system services start, i.e., after switching to a multi-user run level. It is the easiest method to make programs run at boot on Linux systems. But there's a caveat: you can only use this method for programs with no GUI (graphical user interface) elements since rc.local executes before Raspberry Pi's windowing system starts.
To set a program to run at boot, we need to alter the rc.local file and add commands to it. Here's how to do that.
- Open the terminal and type the following command to open the rc.local file: sudo nano /etc/rc.local.
- In the rc.local file, enter the following line of code before the "exit 0" line: python3 /home/pi/PiCounter/display.py &.
- Here, replace PiCounter/display.py with your program/script name. Also, make sure that you use the absolute path to your program and not its relative path.
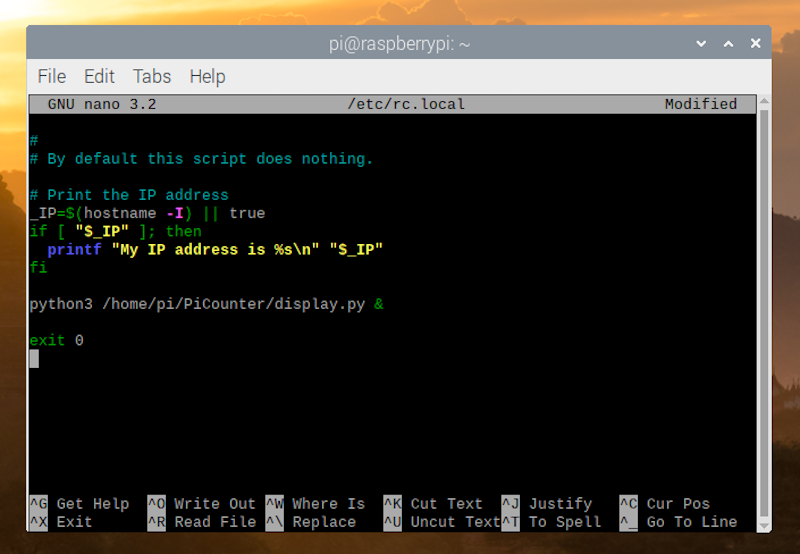
- After that, hit CTRL + O to save the file.
- In the terminal, enter sudo reboot.
(Notice that the command ends with the ampersand (&) symbol. This to inform the system that the program we're scheduling runs continuously, so it shouldn't wait for your script to finish before starting the boot sequence. Do note that failing to add ampersand in the command will cause the script to run forever, and your Pi will never boot up.)
Once your Pi boots up, it should run your program automatically. If, for some reason, you want to stop the program from running on boot, edit the rc.local file again to remove the line you just added.
2. Use Cron to Schedule a Program
Cron is a configuration and job-scheduler utility on Unix-like systems. It lets you schedule programs that you want to run at fixed intervals or periodically.
Cron's functionality relies on the crond daemon, which is a background service that runs programs scheduled in the crontab. All the programs scheduled on the system reside in the cron job table (or crontab).
So you'll need to modify this table to add a schedule for the program that you want to run at startup. Here's how:
- Open the CLI on your Raspberry Pi and enter crontab -e to edit the cron job table (crontab). If you're opening crontab for the first time, you'll need to select an editor. You can choose your preferred editor or continue with Nano. In either case, enter the name of the editor and hit Enter.
- To make an entry into the cron table, enter the command: @reboot python3 /home/pi/PiCounter/display.py &. In your command, make sure you replace the program name and its path.
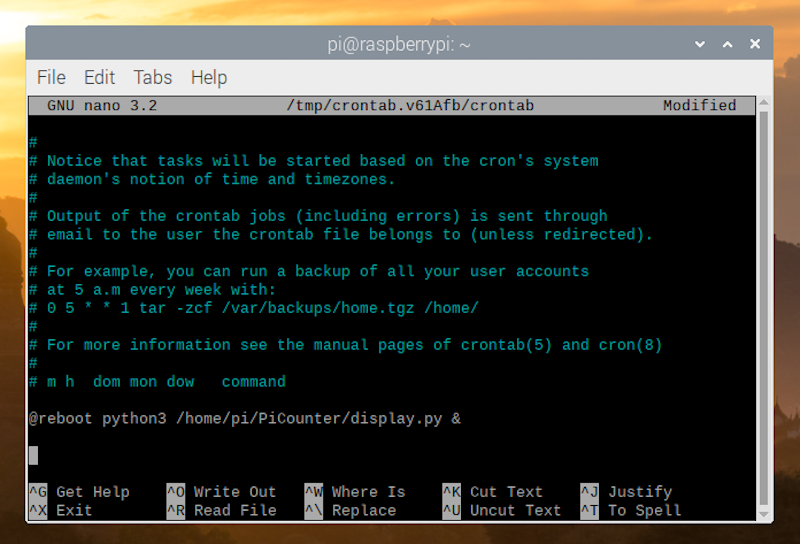
- Press CTRL + O to write the line to the crontab.
- Type sudo reboot in the terminal to reboot your Pi.
Cron should now run your program every time your Pi boots up. If you want to stop this schedule, delete the command in crontab.
3. Run GUI Programs on Startup With Autostart
Autostart is the best way to run GUI-based Raspberry Pi programs on startup. It works by ensuring that both the X Window system and the LXDE desktop environment are available before the system runs any of the scheduled programs.
If you have a script that runs in the windowed mode, or you want to run any of the GUI-based programs/applications at startup on your Raspberry Pi, you should schedule them to run using autostart. Here are the steps to do this.
- First, open the terminal and enter the following command to create a .desktop file in the autostart directory: sudo nano /etc/xdg/autostart/display.desktop. We've used display.desktop as file name, but you can name your desktop file anything you want.
- In the .desktop file, add the following lines of code:
              [Desktop Entry]
Name=PiCounter
Exec=/usr/bin/python3 /home/pi/PiCounter/display.py - In this file, replace the value for the Name field with your project/script name. Similarly, we've added our display.py program to run every time the Raspberry Pi boots up.
- However, you can replace it with any program that you want to run. In fact, you can even schedule to run a third-party program, like the Chrome browser; in which case, the .desktop file should include the following code:
              [Desktop Entry]
Name=Chrome
Exec=chromium-browser - After that, hit CTRL + O to save the file, and then enter sudo reboot to restart the Pi.
As soon as your Pi boots up, your GUI program should automatically start as well. In case you'd like to stop your program from running at startup anymore, simply go to the autostart folder and remove the .desktop file you just created.
Successfully Running a Program at Startup on Raspberry Pi
While there are many ways to run a program at startup on Linux-based systems, the methods we've mentioned in this guide should help you with scheduling programs on the Raspberry Pi.
So no matter what kind of program you want to run — custom script or a third-party application — these methods should have you covered. And, you should be able to reduce the extra step required to execute the program every time you want to run it.
Source: https://www.makeuseof.com/how-to-run-a-raspberry-pi-program-script-at-startup/
0 Response to "Raspbian Continuously Run Python Script on Boot"
Post a Comment